1About This Guide
This guide explains how to use the User Offboarding application to reassign ownership of Salesforce records from one user to another. It is written for Salesforce administrators and anyone who has been granted the Ownership Transfer Manager permission set.
You do not need Apex, SOQL, or developer knowledge to use the app. Everything described here is performed through the Lightning Experience user interface.
Who should read this
- Salesforce administrators handling employee departures, role changes, or territory reassignments.
- Operations and HR-systems staff who own the offboarding checklist and need an auditable record of what moved.
- Compliance reviewers who need to confirm that a departing user no longer owns records.
2What the App Does
Salesforce's native mass transfer tool works on one object at a time. If a departing user owns Accounts, Opportunities, Cases, Tasks, files, and records in a dozen custom objects, you have to repeat the same process for each one — and remember every object you need to check.
User Offboarding does this in a single pass. You pick the departing user and the new owner, and the application:
- Discovers every object automatically. It scans your org for every queryable object that has an updateable OwnerId field. There is no list to maintain.
- Lets you preview first. A Dry Run scans and reports exactly what would change, without touching a single record.
- Processes each object in its own batch. Large objects are chunked, so the job completes reliably regardless of record volume.
- Records everything. Each object produces a batch record with counts and per-record detail, and the whole job produces a downloadable CSV audit log.
- Tells you when it is done. You get an in-app notification and an email summary with a per-object breakdown.
3Before You Start
Requirements
| Requirement | Detail |
|---|---|
| Salesforce edition | Enterprise, Unlimited, Performance, Developer, or Professional* |
| User interface | Lightning Experience (the app is desktop / large form factor) |
| Permission | Ownership Transfer Manager permission set assigned to your user |
| External services | None — the app is 100% native and your data never leaves Salesforce |
* Professional Edition requires that the package's Apex is enabled; validate in a Professional Edition org before rolling out.
Pre-flight checklist
- Confirm the target user is active and has the licences, profile access, and record access needed to own the incoming records.
- Decide what must not move. Add any sensitive or system objects to the Restricted Objects list before you run (see section 10).
- Check your Apex batch capacity. The job chains one batch per object, so run it outside of periods when other heavy batch jobs are queued.
- Do not deactivate the departing user yet. Records can only be queried against an existing user; deactivate after the transfer has completed successfully.
- Always run a Dry Run first, then review the results before committing to a Full Run.
4Setup and Access
Assign the permission set
Every user who will run transfers needs the Ownership Transfer Manager permission set. It grants the app, its tabs, its objects, and — critically — the Can Transfer Ownership custom permission that the application checks before it will start any job.
- From Setup, go to Users → Permission Sets.
- Open Ownership Transfer Manager.
- Click Manage Assignments, then Add Assignment.
- Select the users, and click Assign.
Open the app
- Click the App Launcher (the grid icon, top left).
- Search for and open User Offboarding.
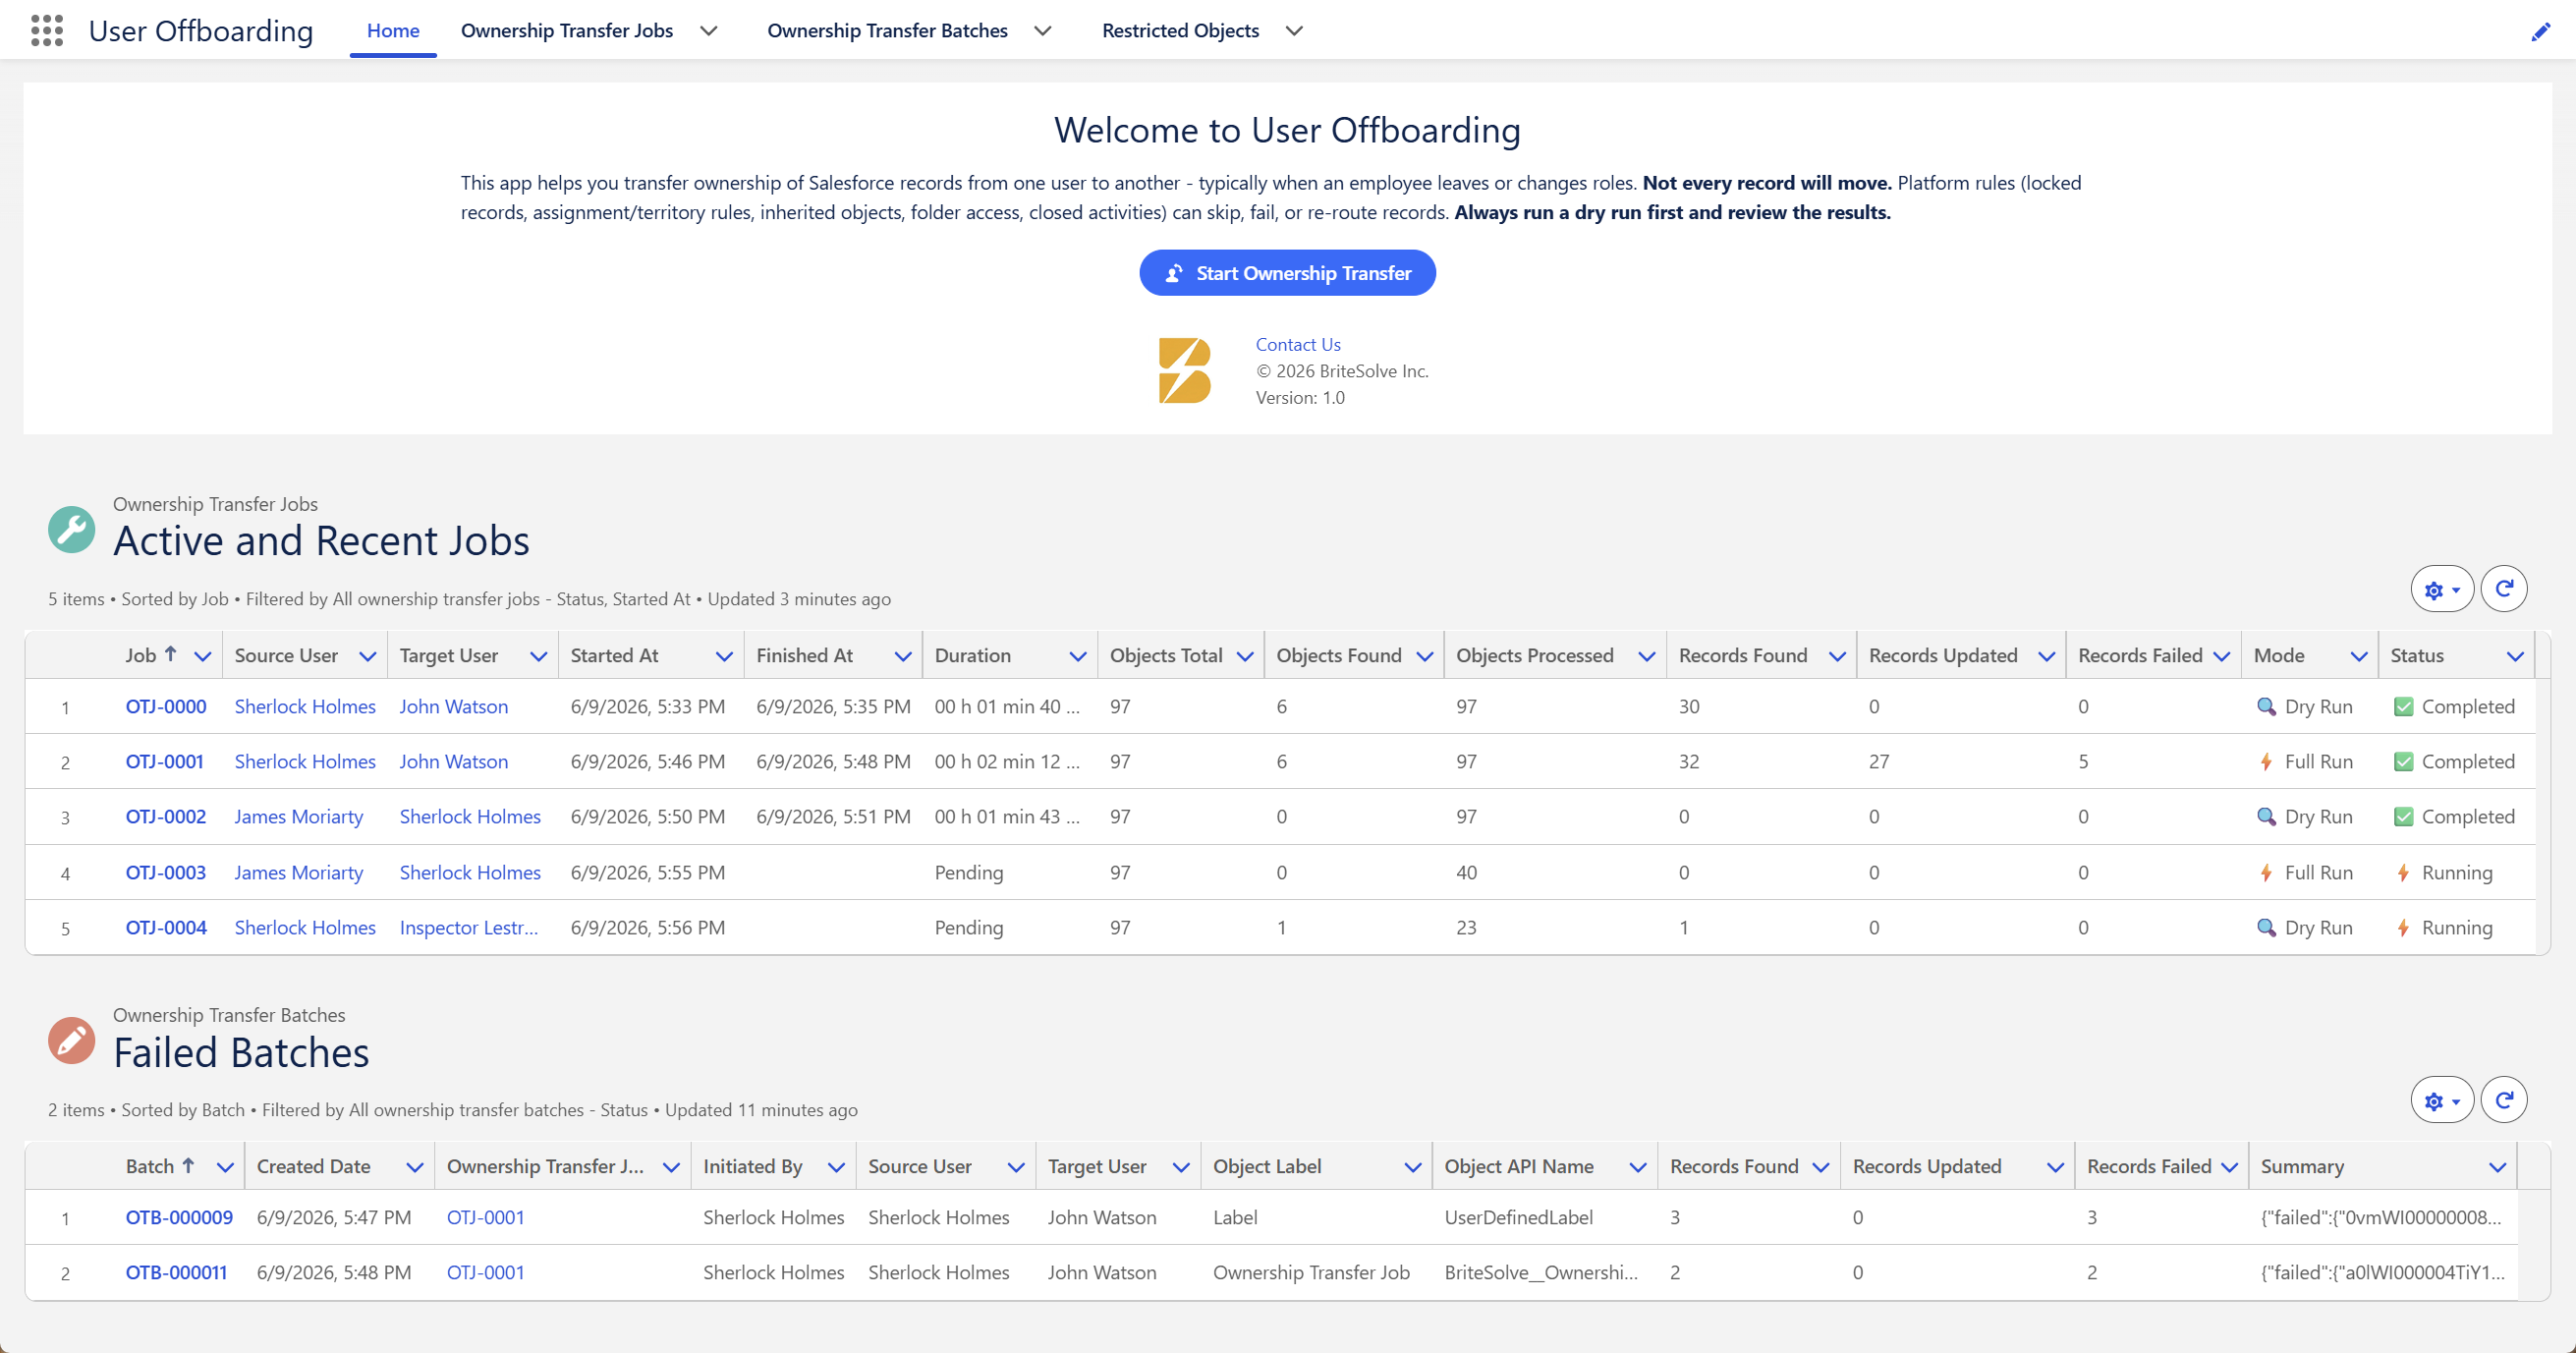
The app opens on the User Offboarding home tab and provides three further tabs:
| Tab | What it holds |
|---|---|
| User Offboarding | The home page — the welcome panel and the Start Ownership Transfer button. |
| Ownership Transfer Jobs | One record per transfer request, with status, counts, and results. |
| Ownership Transfer Batches | One record per object processed within a job, with per-record detail. |
| Restricted Objects | The exclusion list — objects that must never be transferred. |
5Understanding the Two Run Modes
Every job runs in one of two modes. You choose the mode when you start the job.
| Dry Run | Full Run | |
|---|---|---|
| What it does | Scans and counts only | Scans and reassigns ownership |
| Changes your data | No — nothing is written | Yes — records are updated |
| Batch status shown | Scanned | Updated / Failed / Type Error |
| Counts reported | Records Found | Records Found, Updated, and Failed |
| CSV log produced | Yes (rows marked Scanned) | Yes (rows marked Updated or Failed) |
| Typical use | Preview and impact assessment | The actual transfer |
6Walkthrough: Running a Transfer
The recommended sequence is a Dry Run, a review, then a Full Run launched directly from the completed Dry Run job.
Step 1 — Start the job
- Open the User Offboarding app and stay on the home tab.
- Click Start Ownership Transfer.
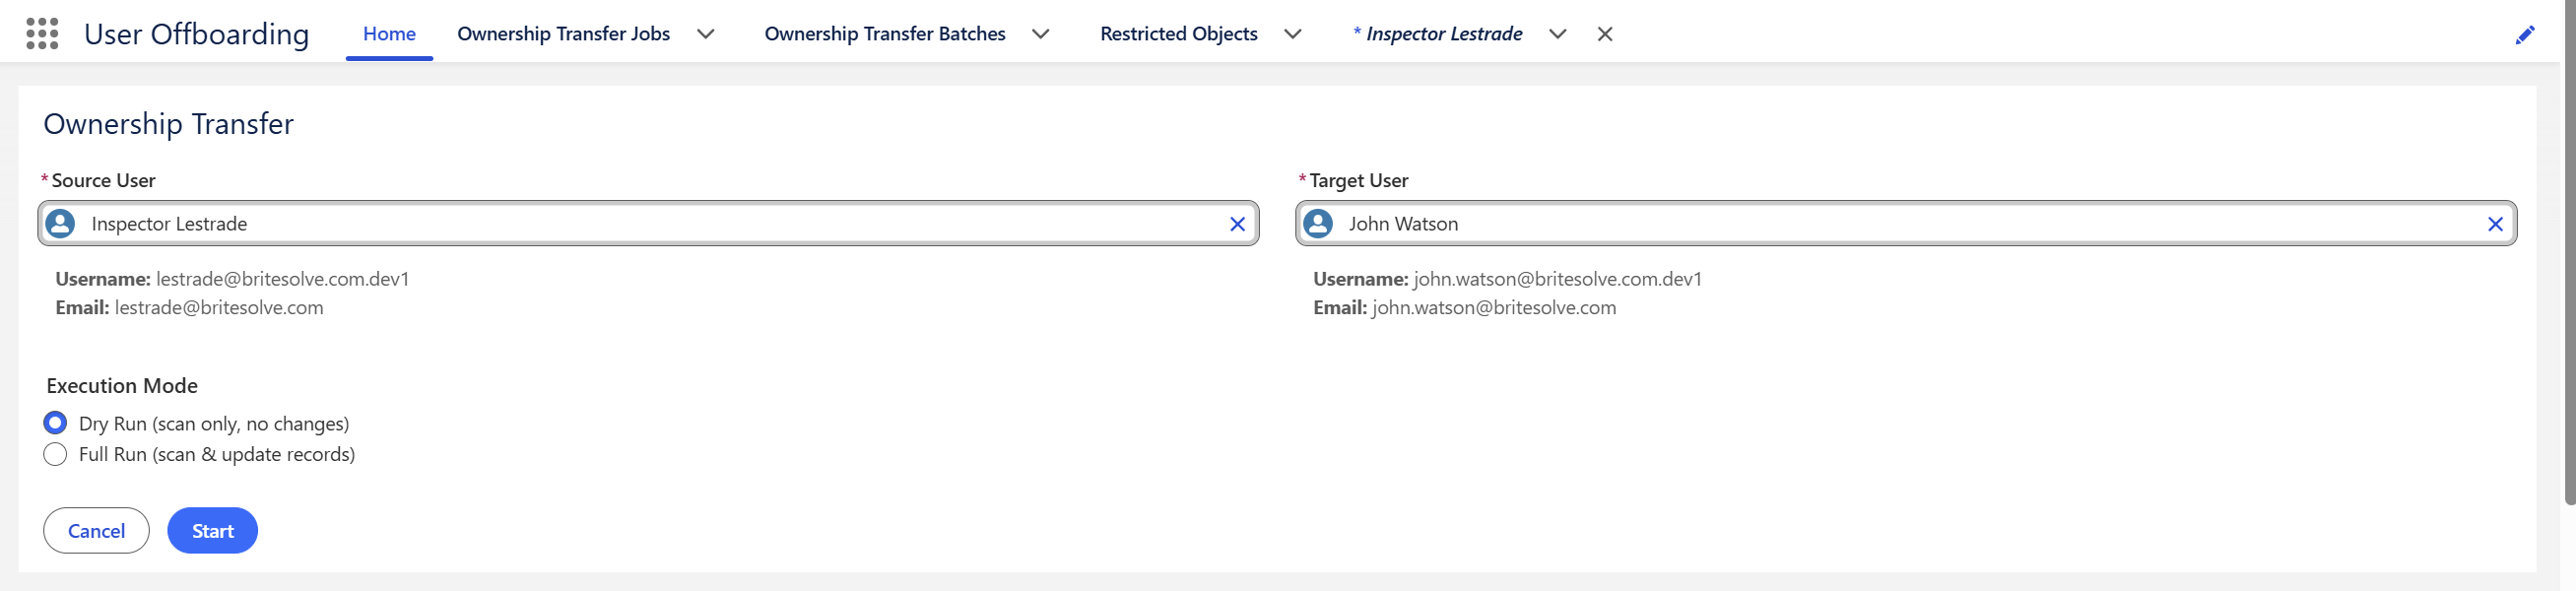
- In Source User, search for and select the departing user. The app displays that user's username and email so you can confirm you have the right person.
- In Target User, search for and select the user who will receive the records. Their username and email are shown for confirmation too.
- Under Execution Mode, leave Dry Run (scan only, no changes) selected for your first pass.
- Click Start.
The Start button stays disabled until both users are selected. The source and target must be different users; choosing the same user for both produces an error.
Once started, you are taken straight to the new Ownership Transfer Job record, where the job runs in the background.
Step 2 — Review the Dry Run
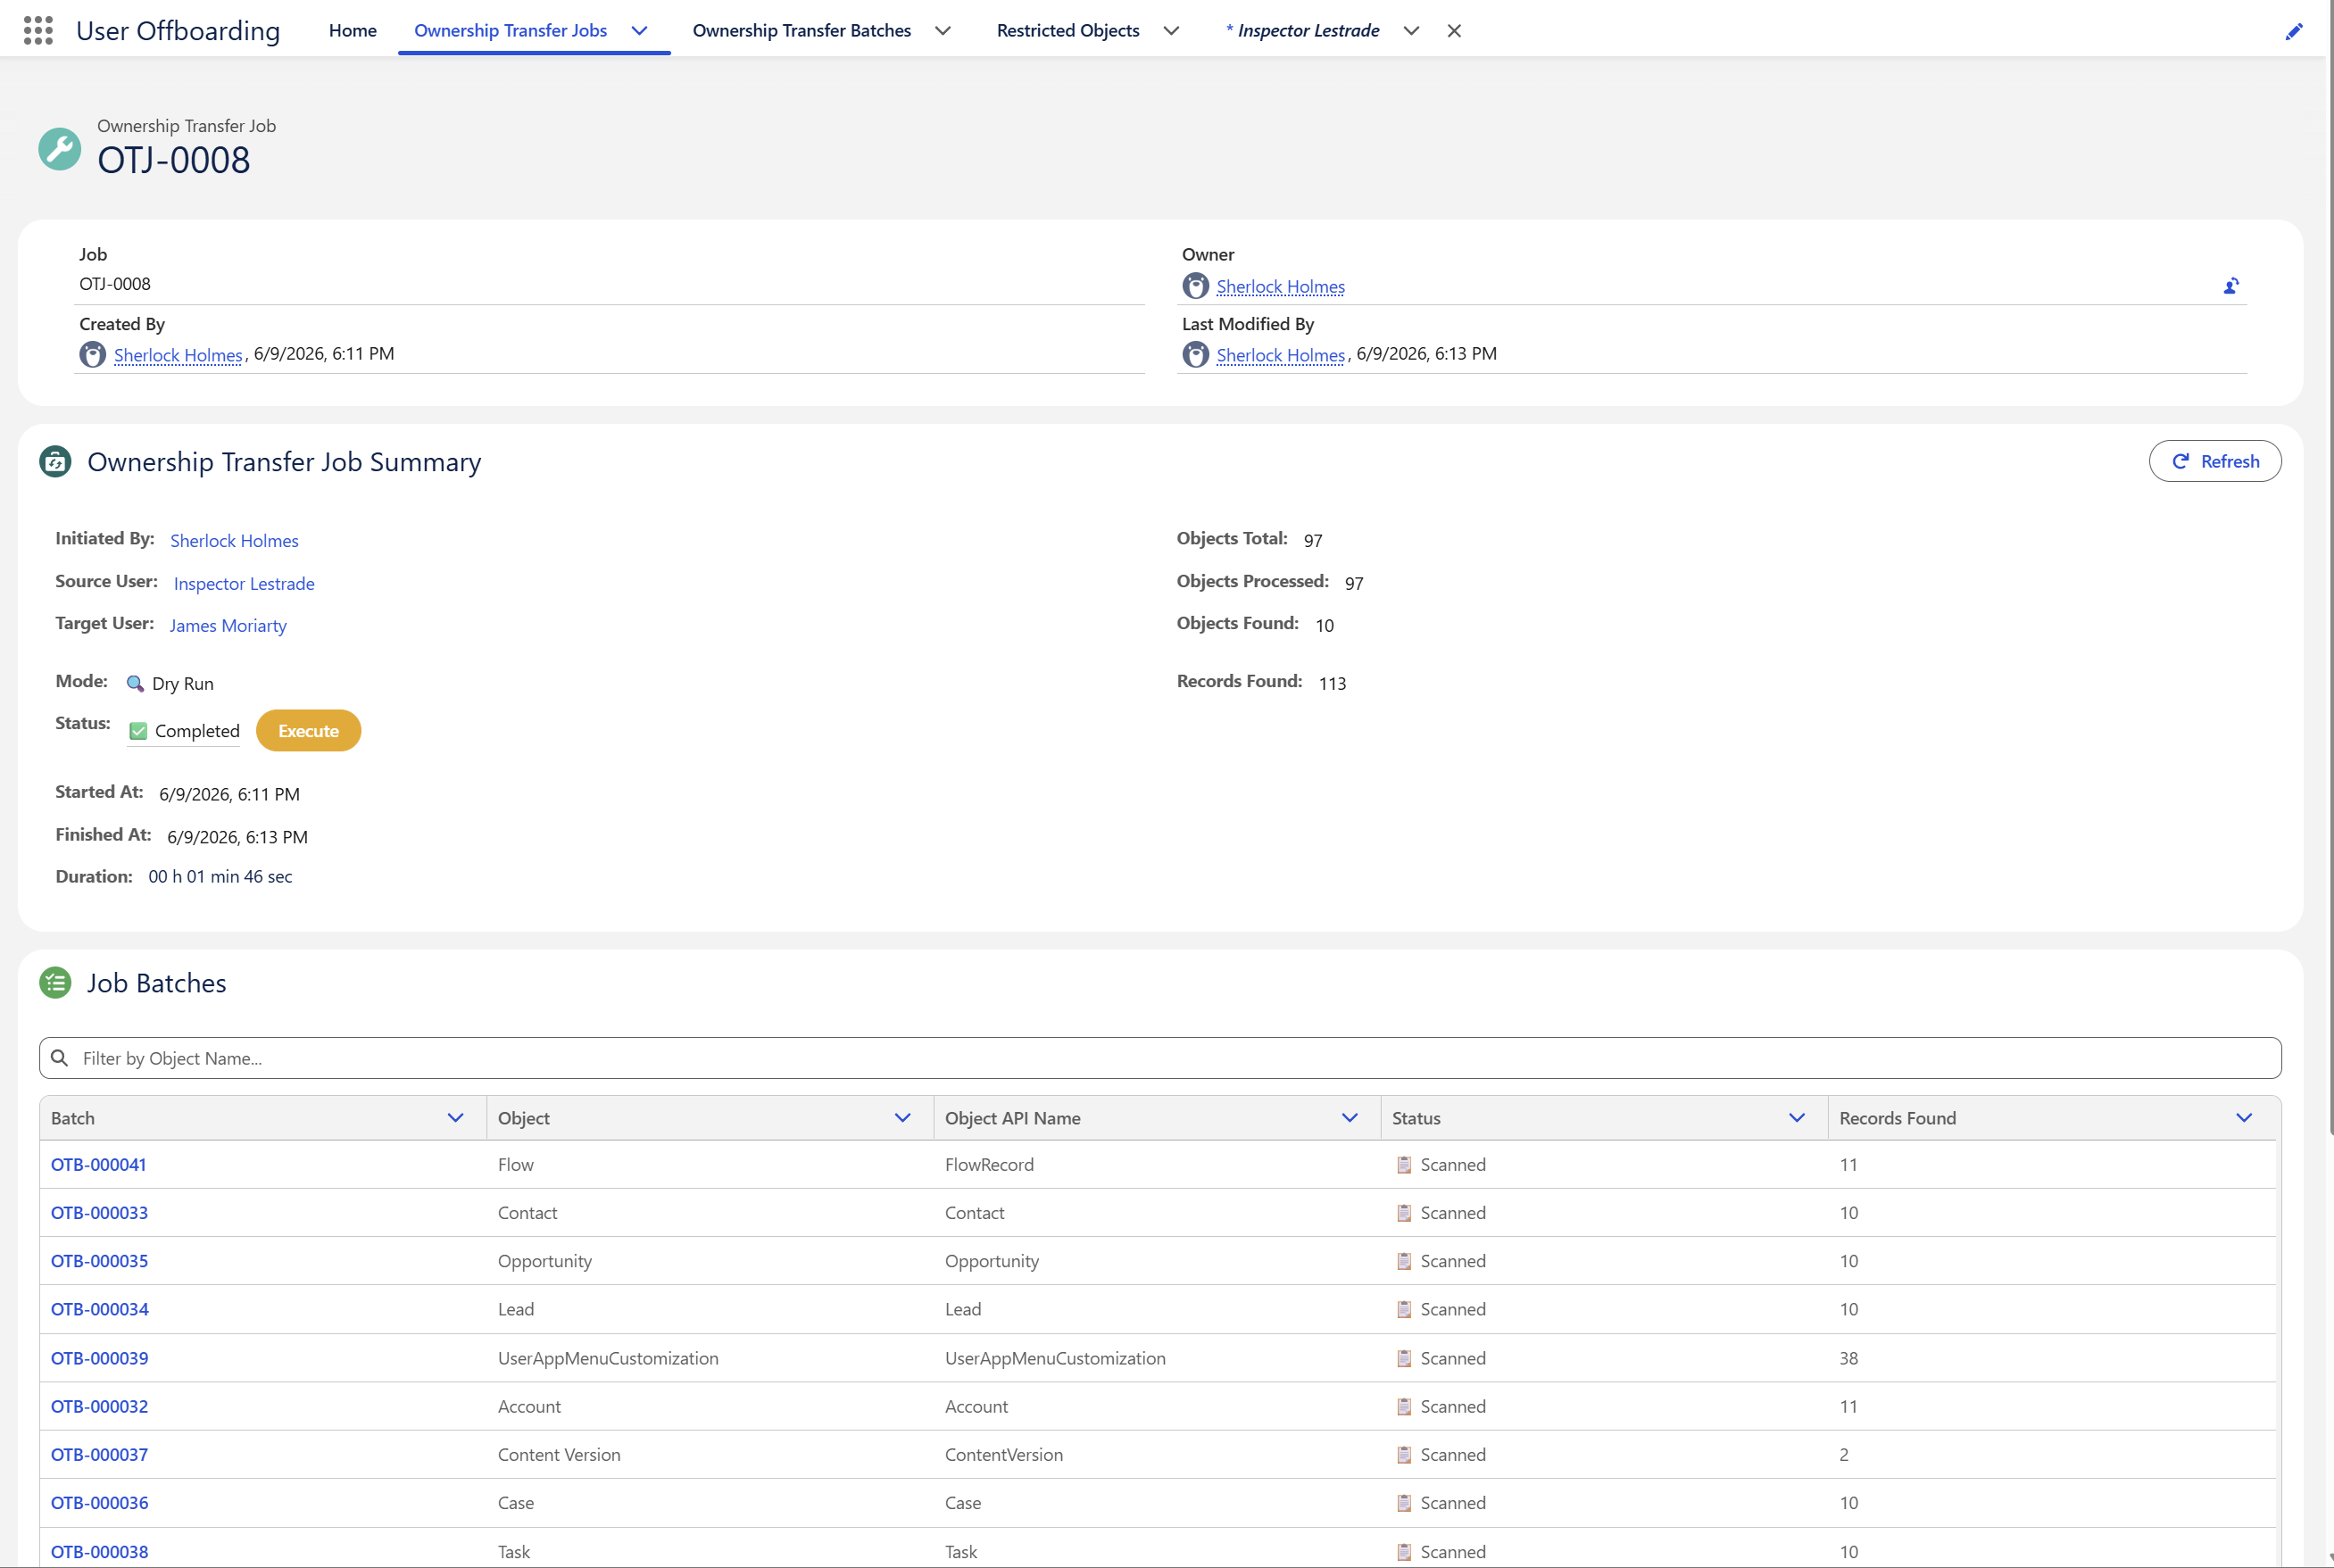
Wait for the job's status to reach ✅ Completed, then review:
- Objects Found — how many objects actually contained records owned by the source user.
- Records Found — the total number of records that would be reassigned.
- The Transfer Batches table — the per-object breakdown. Sort by Records Found to see where the volume is, or search for a specific object.
- Open any batch record to see the individual records it identified.
This is the moment to add anything you do not want moved to the Restricted Objects list. Then start a fresh Dry Run so the preview reflects the exclusions.
Step 3 — Execute the Full Run
When a Dry Run job has completed, an Execute button appears next to the Status field on the job record.
- Click Execute.
- A confirmation dialog shows the source user, the target user, and the scan result — for example, Based on the scan: 1,482 records across 17 objects.
- Read the notice about re-scanning, then click Execute to confirm.
A new job record is created in Full Run mode and you are navigated to it. The original Dry Run job is left intact as a record of the preview.
7Monitoring a Running Job
The Ownership Transfer Job Summary panel at the top of the job record is your live view of progress. While the status is ⚡ Running, it shows:
| Field | Meaning |
|---|---|
| Status | Running, Stopped, or Completed |
| Summary | The object currently being processed — e.g. Processing: Opportunity |
| Duration | Live elapsed time, recalculated each time the panel renders |
| Objects Total | The number of transferable objects discovered at job start |
| Objects Processed | How many of those have been handled so far |
| Objects Found | How many objects actually contained records owned by the source user |
| Records Found | Running total of records identified |
| Records Updated | Running total successfully reassigned (Full Run only) |
| Records Failed | Running total that could not be reassigned (Full Run only) |
Objects Total will be much larger than Objects Found. Objects Total counts every object in your org that could hold owned records — typically several hundred. Objects Found counts only those where the source user actually owned something. A job that reports 4 objects found out of 612 total is working correctly.
8Reading the Results
The Transfer Batches table
Below the summary, the Transfer Batches table lists one row per object that contained records. It is searchable and every column is sortable.
| Column | Meaning |
|---|---|
| Batch | The batch record number (e.g. OTB-000123) — click to open the detail |
| Object | The object's friendly label, e.g. Opportunity |
| Object API Name | The API name, e.g. Opportunity or Project__c |
| Status | Scanned, Updated, Failed, or Type Error |
| Records Found | Records identified in this batch |
| Records Updated | Records successfully reassigned (Full Run only) |
| Records Failed | Records that could not be reassigned (Full Run only) |
The Records Updated and Records Failed columns are hidden for Dry Run jobs, because nothing was updated.
Batch statuses
| Status | What it means | What to do |
|---|---|---|
| 📋 Scanned | Dry Run only. Records were identified; nothing was changed. | Nothing — this is the expected Dry Run result. |
| ✅ Updated | Every record in the batch was reassigned successfully. | Nothing. |
| ❌ Failed | One or more records could not be updated. The rest succeeded. | Open the batch and read the per-record errors. |
| 🚫 Type Error | The object cannot have its ownership transferred at all — usually because it inherits ownership from a parent record. The object is added to Restricted Objects automatically. | No action needed. Future jobs will skip it. |
The batch detail page
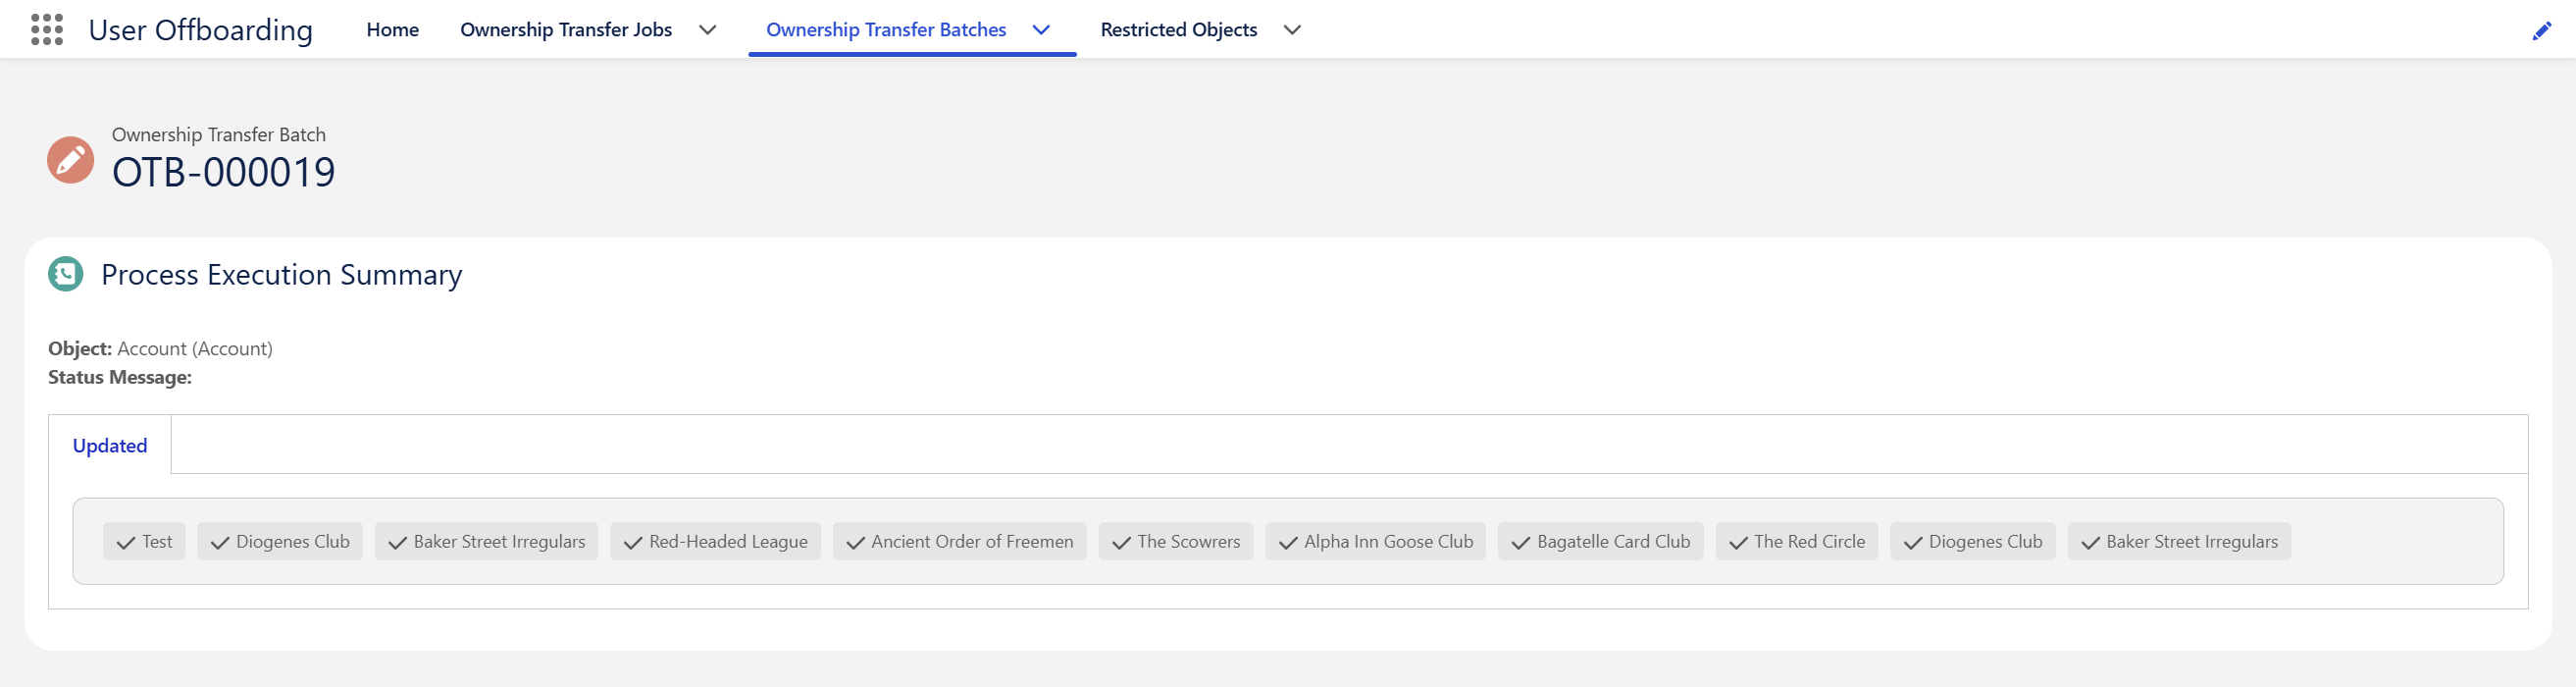
Opening a batch record shows the Process Execution Summary, which reports the object, a status message, and up to three tabs:
- Found — records identified during a Dry Run, shown as clickable badges with the record's name.
- Updated — records successfully reassigned during a Full Run.
- Failures — a table of records that failed, each with its specific error message and a link to the record.
Tabs that would be empty are not displayed. Every record name links straight to the record, so you can inspect a failure without leaving the app.
9The Transfer Log CSV
When a job finishes, the app automatically generates a record-level CSV audit log and attaches it to the job record. Find it in the Files related list at the bottom of the job page, named Transfer_Log_<JobId>_0.csv.
Very large jobs are split across several files — _0, _1, _2, and so on. Download them all for the complete picture.
Columns in the CSV
| Column | Contents |
|---|---|
| Log ID | The ID of the batch record this row came from |
| Initiated By | The user who started the job |
| Source User | The departing user |
| Target User | The receiving user |
| Object API Name | e.g. Opportunity |
| Object Label | e.g. Opportunity |
| Record ID | The individual record's Salesforce ID |
| Status | Scanned, Updated, or Failed |
| Error | The error message, for failed rows only |
This file is the artefact to keep for compliance. It documents exactly which records changed hands, when, and at whose instruction.
10Restricted Objects
The Restricted Objects tab is your exclusion list. Any object listed there is skipped entirely — it is never scanned and never updated by any job.
Adding an exclusion manually
- Open the Restricted Objects tab.
- Click New.
- Enter the Object API Name exactly as Salesforce defines it — for example Case or Invoice__c. The match is exact and case-sensitive, so a typo silently does nothing.
- Optionally enter the Object Label and a Notes value explaining why the object is excluded.
- Click Save. The exclusion applies to the next job you start.
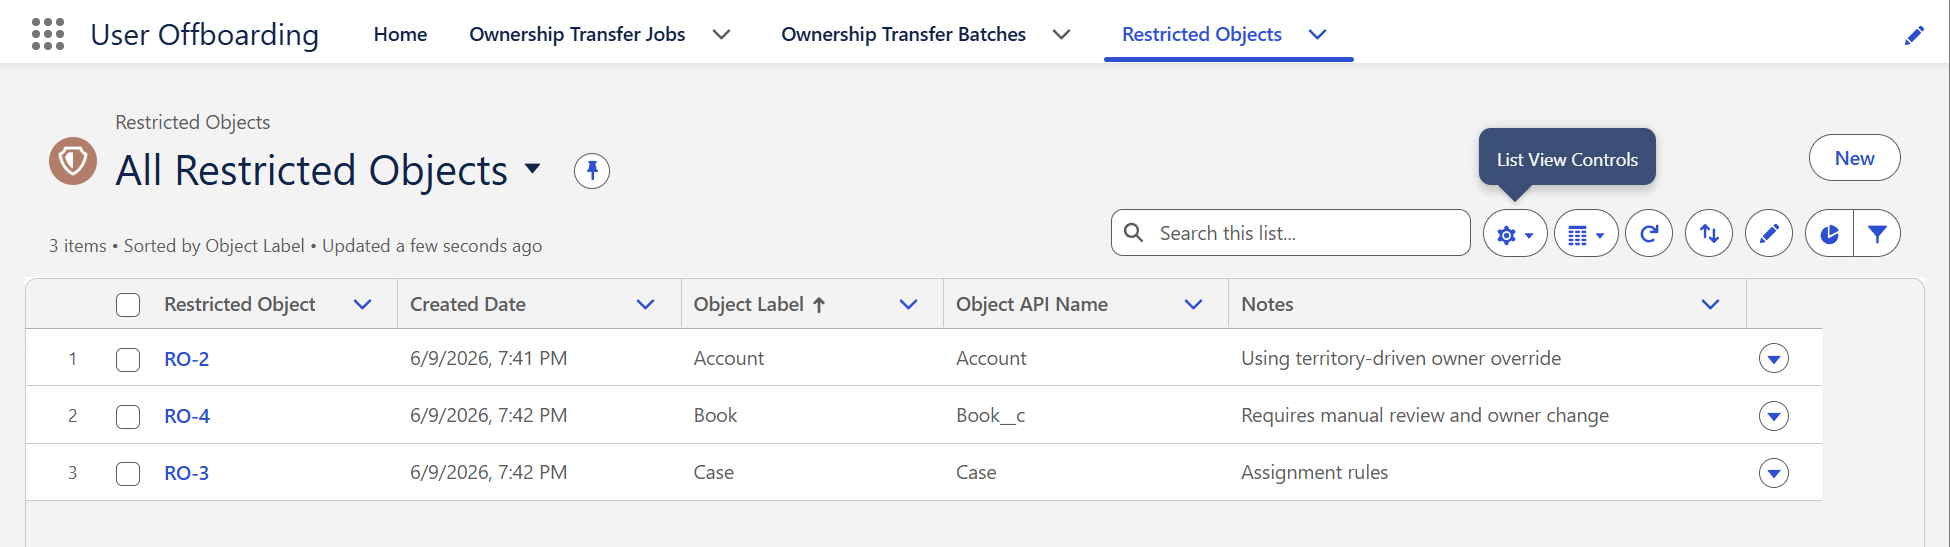
Entries the app adds by itself
When a Full Run discovers that an object cannot have its ownership changed at all — typically a detail object whose owner is inherited from its parent — it marks the batch as 🚫 Type Error and adds that object to Restricted Objects automatically, with the underlying error stored in Notes. Subsequent jobs skip it, so the list gets smarter with use.
ContentDocument is always excluded internally: transferring the ContentVersion moves the parent document as well, so processing both would be redundant.
Removing an exclusion
Delete the Restricted Object record. The object will be included again from the next job onward. Be careful when deleting entries the app created itself — they usually record a genuine platform limitation, and re-including such an object will simply produce the same errors again.
11What Gets Transferred (and What Does Not)
How objects are selected
At the start of every job, the app builds its own list of transferable objects. An object is included only when all of the following are true:
- It is queryable in your org.
- It is not on the Restricted Objects list.
- It is accessible to the running user.
- It has an OwnerId field.
- That OwnerId field is both readable and updateable.
Everything else is skipped before the job even begins — which is why Objects Total is a much smaller number than the total object count in your org.
Objects with special handling
Some standard objects would reliably fail or cause unwanted side effects if transferred wholesale, so the app narrows what it selects for them:
| Object | Only these records are transferred |
|---|---|
| Files (ContentVersion) | The latest version of each file. The parent ContentDocument is reassigned at the same time, so files move intact. |
| Task | Open tasks only. Closed tasks are historical and are left with the original owner. |
| Event | Non-child events that are either in the future or part of a still-active recurring series. Past events are left alone. |
| Quote | Quotes that are not currently syncing with an opportunity. |
| Order | Orders that are not Activated. |
| Contract | Contracts that are not Activated. |
| Knowledge (Knowledge__kav) | Draft articles only. Published and archived versions are not reassigned. |
Why individual records can still fail
Even within a selected object, the platform can refuse an individual update. Common causes:
- Locked records — records in an approval process cannot be edited.
- Validation rules that reject the change, for example a rule requiring the owner to hold a particular role.
- Assignment or territory rules that immediately re-route the record to a different owner.
- Sharing and access limits — the target user may not be permitted to own the record.
- Inherited ownership — detail records in a master-detail relationship take their owner from the parent.
Every one of these appears in the batch Failures tab with the platform's own error message, and in the CSV log with status Failed. Nothing fails silently.
12Stopping a Job
While a job is running, a Stop button appears next to the Status field on the job record.
- Click Stop.
- Read the confirmation dialog. It reports how far the job has got — for a Full Run it also tells you how many records have already been transferred.
- Click OK to confirm.
The job stops at the next safe point. Its status becomes 🛑 Stopped, and the summary records where it stopped — for example Job stopped by user while processing Opportunity. The CSV log and the completion email are still produced for the work that was done.
13Notifications and Email Summary
You do not have to watch a job to completion. When it finishes, the app notifies the user who started it in two ways.
In-app notification
A bell notification titled Ownership Transfer Completed appears on desktop and in the Salesforce mobile app. You will also receive a notification confirming the transfer report file has been generated.
Email summary
An email is sent to the user who started the job. It contains the job number, the source and target users, the start time, finish time, and duration, plus a table of every object where records were updated or failed, with the counts for each. A View Job Details button links straight back to the job record.
14Field Reference
Ownership Transfer Job
Record numbering: OTJ-0000. One record per transfer request.
| Field | Description |
|---|---|
| Initiated By | The user who started the job |
| Source User | The user whose records are being transferred away |
| Target User | The user receiving the records |
| Mode | 🔍 Dry Run or ⚡ Full Run |
| Status | ⚡ Running, 🛑 Stopped, or ✅ Completed |
| Summary | Live progress message while running; the stop reason if stopped |
| Started At / Finished At | Job start and end timestamps |
| Duration | Formatted elapsed time; shows Pending until the job finishes |
| Objects Total | Transferable objects discovered at job start |
| Objects Processed | Objects handled so far |
| Objects Found | Objects that actually contained records owned by the source user |
| Records Found | Total records identified |
| Records Updated | Total records successfully reassigned |
| Records Failed | Total records that could not be reassigned |
Ownership Transfer Batch
Record numbering: OTB-000000. One or more records per object processed, linked to the parent job.
| Field | Description |
|---|---|
| Ownership Transfer Jobs | The parent job |
| Object API Name | API name of the object processed |
| Object Label | Friendly label of the object processed |
| Status | 📋 Scanned, ✅ Updated, ❌ Failed, or 🚫 Type Error |
| Records Found / Updated / Failed | Counts for this batch |
| Summary | The stored per-record detail rendered by the batch detail page |
Restricted Object
Record numbering: RO-{0}. One record per excluded object.
| Field | Description |
|---|---|
| Object API Name | The exact API name to exclude — must match Salesforce precisely |
| Object Label | Optional friendly name, for readability |
| Notes | Why the object is excluded. Populated automatically with the platform error when the app adds an entry itself. |
Useful list views
Each object ships with list views to help you find things quickly: Jobs offers All Jobs, Recent Jobs, Running Jobs, Completed Jobs, and Stopped Jobs; Batches offers All Batches, Updated Batches, Failed Batches, and Recent Failed Batches; Restricted Objects offers All Restricted Objects.
15Troubleshooting
| Symptom | Cause and resolution |
|---|---|
| Access Denied: You do not have the "Can Transfer Ownership" permission assigned to your user. | Your user is missing the Can Transfer Ownership custom permission. Assign the Ownership Transfer Manager permission set (section 4). |
| Both source and target user must be selected. | One of the pickers is empty. Select both users and try again. |
| Source and target users should be different. | You selected the same user twice. Choose a different target user. |
| You do not have permission to stop this job. | Your user cannot edit the job's Status field. Confirm the permission set is assigned and has not been modified. |
| The Start button stays greyed out | Both Source User and Target User must be selected before the button enables. |
| Objects Total is in the hundreds | This is expected. It counts every object that could hold owned records. Look at Objects Found for the meaningful number. |
| A whole object shows 🚫 Type Error | The object inherits ownership from a parent and cannot be transferred directly. The app has added it to Restricted Objects; no action is needed. |
| Records Failed is high for one object | Open the batch and read the Failures tab. Validation rules, locked records, and assignment rules are the usual causes. |
| Full Run moved a different number of records than the Dry Run predicted | Expected. The Full Run re-scans from scratch, so any data that changed between the two runs is reflected in the new result. |
| Counts do not appear to be updating | The summary panel does not poll automatically. Click Refresh. |
| No CSV file on the job record | The file is generated after the transfer completes; allow a moment and refresh. If the job found no records at all, no file is produced. |
| No completion email | Check Setup → Email → Deliverability is set to All email. Sandboxes and scratch orgs commonly restrict it. |
| Job appears stuck as ⚡ Running | Check Setup → Apex Jobs. The job chains one Apex batch per object, so a queue backlog or a hit flex-queue limit can delay it. Job records are not left Running once the chain completes. |
16Frequently Asked Questions
Can I undo a transfer?
Not from within the app. There is no rollback. This is precisely why the Dry Run mode exists — preview first, every time. If you must reverse a transfer, you can run a new job in the opposite direction, but be aware that it will move every record the second user now owns, not only the ones you just transferred. The CSV log gives you the exact record IDs if you need a targeted correction.
Do I have to deactivate the departing user first?
No — and you should not. Run the transfer while the user is still active, confirm the results, then deactivate.
Can I transfer only certain objects?
Yes, indirectly. Add every object you do not want moved to the Restricted Objects list. The app always processes all remaining transferable objects; there is no per-job object picker.
Can I run two jobs at the same time?
The app does not prevent it, but it is not advisable. Each job chains one Apex batch per object, and concurrent jobs compete for the same Apex batch capacity. Run them one after another.
Does this move files and attachments?
Yes. Files are transferred via ContentVersion, and the parent ContentDocument is reassigned at the same time, so files move intact rather than being orphaned.
Why were closed tasks and past events left behind?
By design. Closed activities are historical records, and reassigning them misrepresents who did the work. Only open tasks and current or future events are transferred.
What happens to records the target user cannot access?
The update fails and the record is logged with the platform's error message. Confirm the target user's profile, role, and sharing access before the Full Run.
Is any data sent outside my org?
No. The application is 100% native. All processing happens inside Salesforce and no external service is called.
Can I start a transfer from a Flow?
Yes. The app exposes a Transfer Record Ownership invocable action taking a source user ID, a target user ID, and a dry-run flag. It processes one request at a time — bulk invocation is not supported.
How long will a job take?
It depends on the number of objects in your org and the record volume. The job processes objects one at a time in chained Apex batches, so a large org can take a while. You do not need to watch it — you will be notified when it finishes.